I’m guessing you may have seen the recently popular crochet cat couches, right? I planned on making one but honestly, crocheting and knitting takes way too long sometimes! So instead, on the fly mind you, I decided I’d just sew one. The week before I already purchased the foam at Joann’s so I just thought it would be a quick weekend project… Oh how wrong I was! After showing my boyfriend my idea to just make a fabric covering instead of crocheting it, he wanted to make a frame so the foam pieces wouldn’t splay outward when the cats sat on it. In hindsight, it was a great idea!
Dimensions for the exact couch I made will be at the end of this whole description, but as always, I like to describe how I came up with those dimensions because you could also totally make this for a slightly larger small dog or other pet.
I started by using measurements I found online for someone else’s cat couch which are 20″ wide by 13″ deep. They also indicated they made the back 10.5″ high so that’s what I also went with. From there, I worked with the thickness of foam I purchased which was 1″ thick. I decided the back should be 2″ thick (so two pieces of foam), the seat is 3″ thick and each arm is also 3″ thick. Working with the back being a total of 10.5″ high minus 3″ for the seat, that leaves us with 7.5″ of back height. If that’s too small for your pet when they’re lying down/curled up sleeping, you should start adjusting! This was perfect for my cats so I then went on to figure out the height of the arms. I basically just held a ruler up to the highest point of their back and measured it. This needs to be less than the 7.5″ of the total back when the seat is involved. Again, my measurements are below!
Below is a list of the materials I used but please note that this is what I used for the size of couch I made! You might need more if you plan on making a larger couch! This fits my adult 11.5 lb cats…only one at a time lol.
Materials
- 1 yard fabric (I used flannel)
- 2 yards 1″ thick high density foam – purchased at Joann’s
- 505 Temporary Adhesive spray
- one 1/4″ 2×4 plywood
- one 1/2″ 2×4 plywood
- 8 steel corner braces – I purchased two 4 packs from Lowe’s item #809449
- four 5/16″ 3 prong tee nuts – Lowe’s item #137314 (this is the size needed for the specific feet I purchased. You might need a different size if you get different feet! Or omit if you don’t want to use feet )
- Four 4″ end table legs – Lowe’s item #2554
Now let’s go over all of the pieces because there are a lot haha. A diagram will be below but I’ll also number them to make it easier.
Fabric:
- Back, Top Back and Back Rest – cut 1 ** if using a pattern, see notes below at end of instructions BEFORE cutting!**
- Side Back (cut 2 fabric)
- Seat, Inside Arm and Top Arm (cut 1 fabric on fold)
- Outside Arm (cut 2 fabric)
- Front Seat (cut 1 fabric)
- Front Arm (cut 2 fabric)
Foam:
- Back (cut 2 foam) 10.5″ x 20″
- Armrest (cut 6 foam) 7″ x 11″
- Seat (cut 3 foam) 11″ x 14″
- To cut the foam, I used a Crayola washable marker to mark the size and then just cut out the quantity of each foam piece I needed. The marker transfers but is washable! I chose to use these instead of Sharpie because I didn’t want to risk the Sharpie transferring to my skin or fabric and it would be a disaster if it didn’t come out.
Wood Frame:
- Cut 2 arms (1/4″ wood) – 7″ x 13.5″
- Cut 1 back (1/4″ wood) – 11″ x 20.5″
- Cut 1 base (1/2″ wood) – 13″ x 20″
- Once all pieces are cut, we used two L brackets on each arm to secure it to the base and 2 to secure the back to the base so that is 6. We used the remaining two brackets in the corners where the back and arms meet, so one in each corner. Note that the back and arms go on the outside of the base but the back extends so that the 1/4″ thickness of the arms touches the back. Definitely check out the video again if that doesn’t make sense!
- For the feet, I suggest looking up a YouTube video on how to drill the holes for the tee nuts! My partner did the wood working for me!
Fabric
Below are images of the pieces you need to make patterns of with dimensions. Please note that there are NO seam allowances on the below measurements! You will have to add those 🙂 I personally used 3/8″

- If you have a serger, start by serging all the edges.
- On the wrong side of each piece, mark where your seam allowance is in all corners. Remember, there is no seam allowance on the above dimensions. I’ve used both 1/2″ and 3/8″ finally settling on 3/8″.
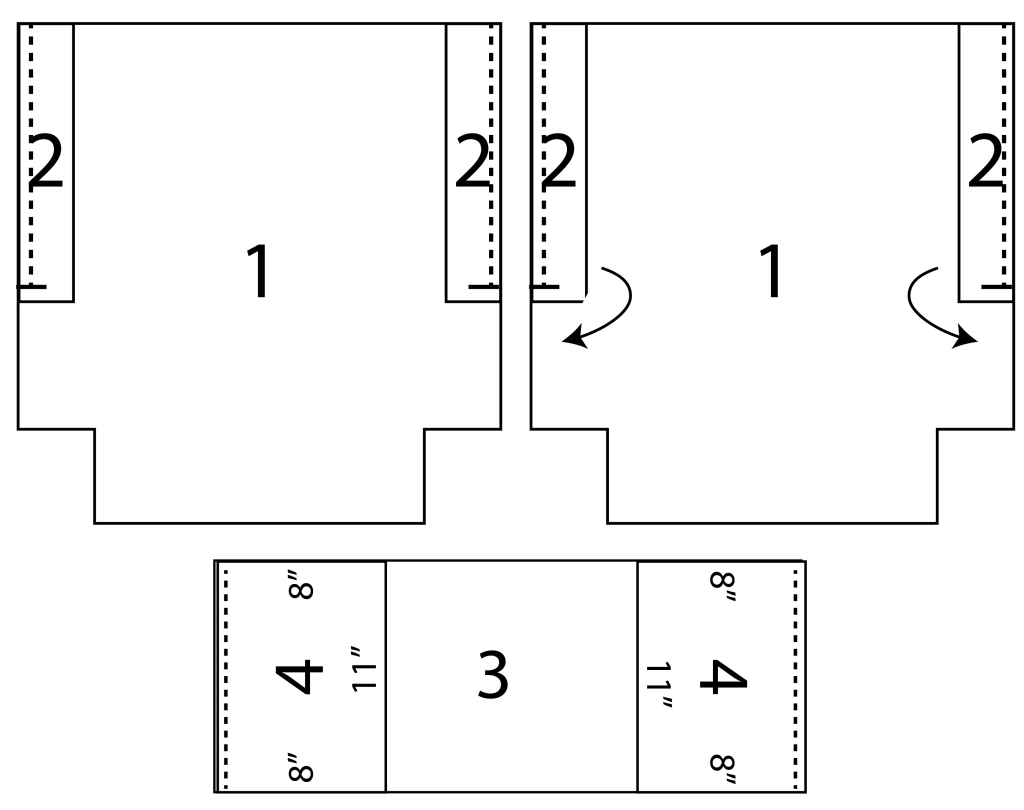
4. Take piece 1 and piece 2 (side back) and line them up like the above image of 1 & 2 on the left. Sew right sides together stopping at your seam allowance on piece 2. Do not backtack or cut your thread! Lift your presser foot and pivot so the 2.25″ side of piece 2 is now aligned with the 17.25″ side of piece 1. This was really hard to illustrate above, but hopefully a part in the video will help! Again, stop at your seam allowance and pivot. Align the other side of piece 2’s 11.5″ side with the last bit of piece 1’s 17.25″ side. Piece 1 is not long enough so you will stop at the indicated seam allowance of piece 1. When it’s done, you should have sewn 3 sides of piece 2 to piece 1. Note that piece 1 is the back, top back and back rest of the couch so you’re kind of sewing a box of sorts.
5. Now take piece 3 with right sides up and align both of the outer arms (piece 4) to the ends. Remember to stop at the indicated seam allowance you marked so it will be easier to sew to piece 1.

6. Now we will sew pieces 1 & 2 to pieces 3 & 4 using the above image to guide you. I indicated with colors above to show what will be sewn to what. You should do this in one length and pivot at each corner. That’s why I said earlier that you should mark every corner with the seam allowance so you know when to pivot. The above images are NOT to scale so the corresponding lines of color don’t match in length, but they do when sewn 🙂

7. Now take pieces 6 & 7 and sew right sides together like above image along dotted lines.

8. By now, piece 1/2 and 3/4 should be sewn together following the color guides. Now, sew piece 5/6 to 3/4 using the above color guide. Again, this is NOT to scale and remember to PIVOT at each corner!
9. Lastly, I used 1/4″ elastic and serged it to the hem so that it tucks in when on the couch.

Help!
** if using a pattern, see notes below at end of instructions BEFORE cutting!**
I don’t see the notes anywhere!
LikeLike
Hi Amanda! It’s been so long since I wrote the pattern that I’m not sure what the notes were! Just make sure to add your own seam allowance since there is none in the measurements given.
LikeLike